You’ve seen the shots. Massive ribs of neon-orange magma cooling into obsidian glass. A plume of white steam—laze—hitting the Pacific Ocean with enough force to make your lungs sting just looking at the screen. People fly across the globe just to get their own volcano pictures from Hawaii, but honestly? Most of them come back with blurry red blobs or dark, grainy messes that look more like a campfire than a tectonic event. It’s frustrating. You’re standing on the edge of the world, watching the Earth create new land in real-time at Kilauea or Mauna Loa, and your phone just... fails you.
The reality is that Hawaii is a tricky beast for photographers. You’re dealing with extreme contrast, unpredictable weather, and literal toxic gases that can mess with your gear. If you’re heading to the Big Island, you need to understand that a good photo isn't just about "point and shoot." It’s about timing, safety, and knowing exactly where the lava is actually flowing—because it moves.
The Brutal Truth About Finding Lava Right Now
Don’t just land at Kona and expect to see fire.
Volcanic activity in Hawaii is driven by the Hawaiian hotspot. Unlike the explosive, "Mount St. Helens" style of volcanoes, Hawaiian eruptions are usually effusive. This means they flow. But they also stop. The USGS Hawaiian Volcano Observatory (HVO) is your only real source of truth here. If they say the eruption is paused, it’s paused. You can’t wish a flow into existence.
When Kilauea is active, the best volcano pictures from Hawaii often come from the Halemaʻumaʻu crater. Since the massive collapse in 2018, the topography has changed completely. What used to be a small vent is now a cavernous pit. If you’re shooting here, you’re likely standing on the rim at a place like Uēkahuna or Kupinaʻi Pali (Waldron Ledge).
It’s dark. Like, really dark.
The mistake most people make is trying to use their flash. Seriously, don't be that person. Your flash won't reach a crater floor a mile away; it’ll just illuminate the dust in front of your face and ruin everyone else’s night vision.
Gear that actually survives the sulfuric acid
Volcanoes are caustic. The air is full of sulfur dioxide ($SO_2$) which, when mixed with humidity, creates a light sulfuric acid mist. It’s bad for your lungs, and it’s definitely bad for your $3,000 glass lens.
- Lens Filters: If you aren't using a UV or protector filter, you’re playing a dangerous game. It’s much cheaper to replace a scratched $50 filter than a front element etched by volcanic glass (Pele's hair).
- Tripods are non-negotiable: For those glowing night shots, you need long exposures. Hand-holding a camera for a 10-second shot of a lava lake will result in a blurry mess every single time.
- The "Plastic Bag" Trick: Bring a simple rain sleeve. It keeps the grit and the acidic mist off your camera body.
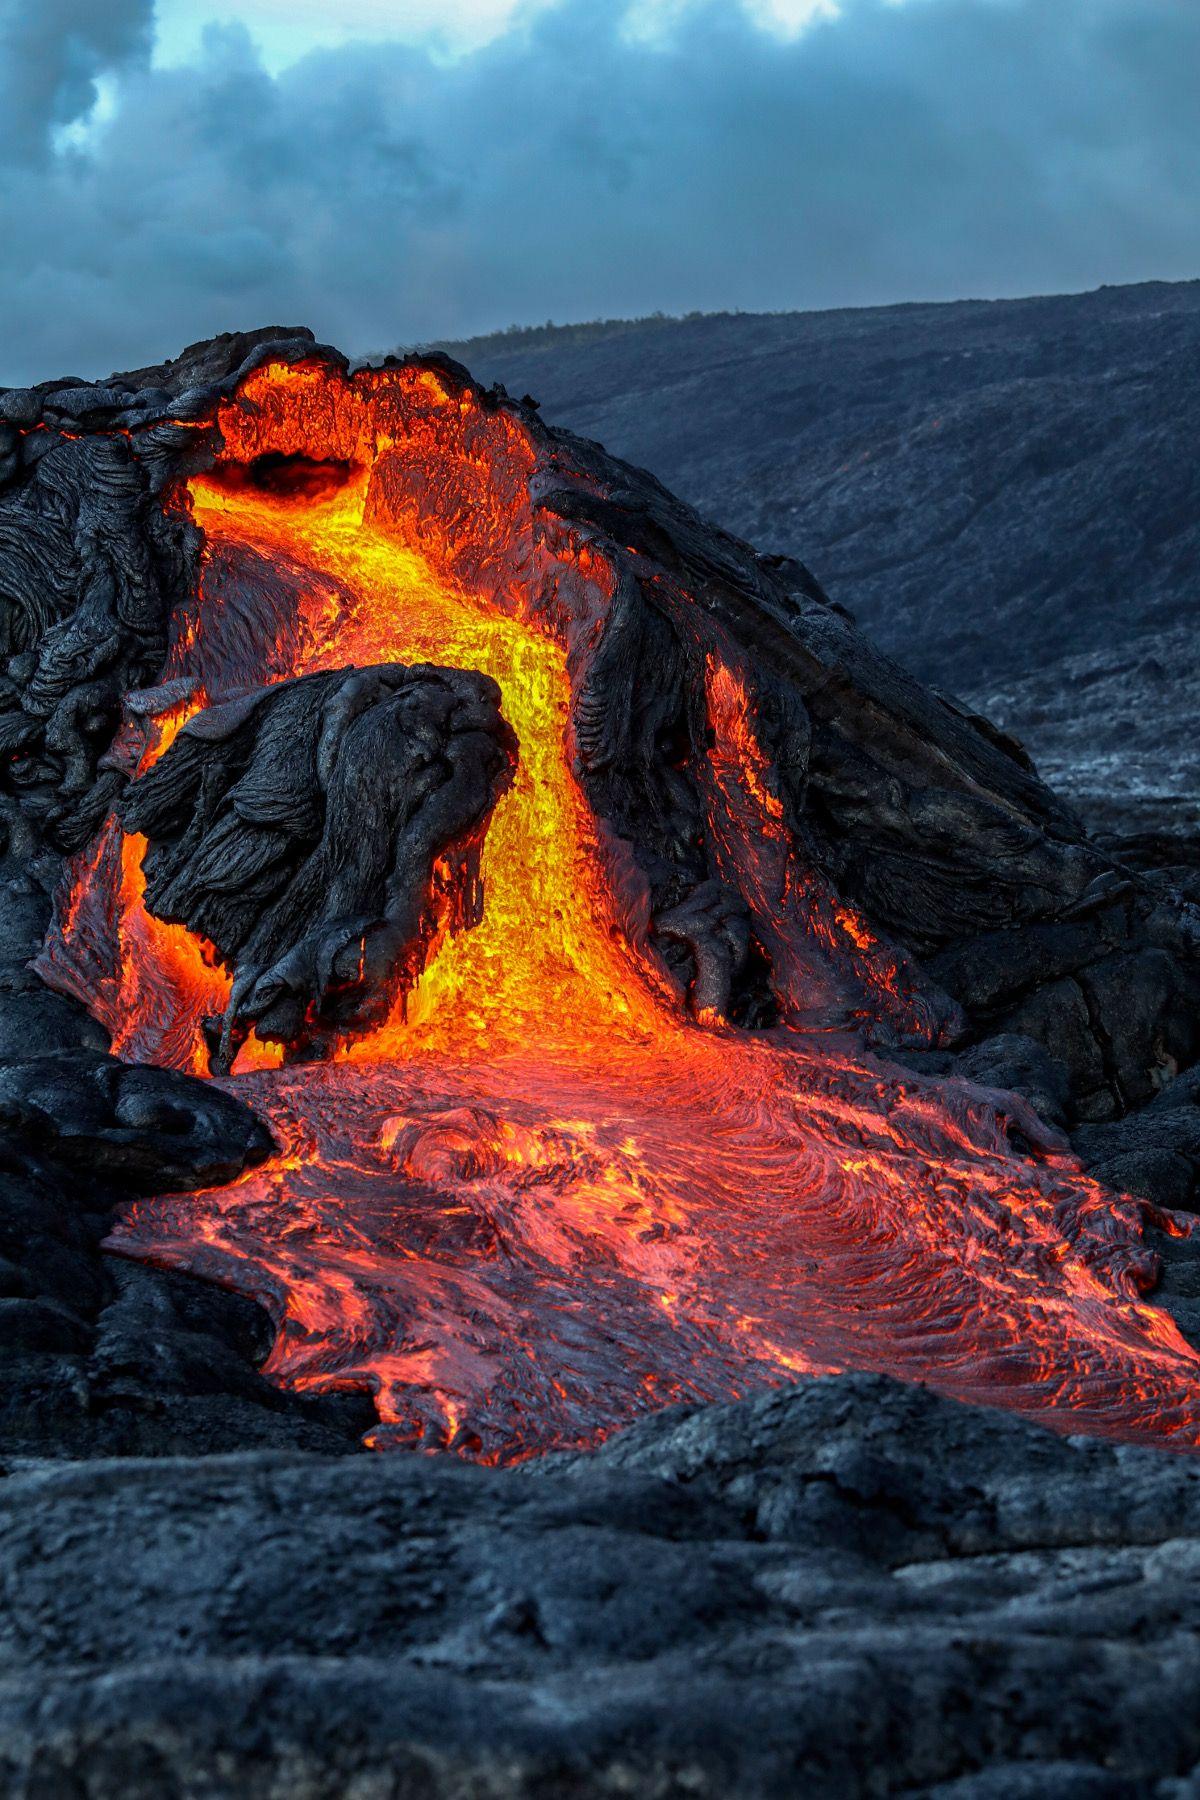
Why Your Night Shots Look Like Mud
Most volcano pictures from Hawaii taken at night suffer from "exposure blow-out." The lava is incredibly bright, but the surrounding rock is pitch black. Your camera’s sensor gets confused. It tries to brighten the rocks, which turns the lava into a white, featureless blob.
You have to underexpose.
Basically, tell your camera the scene is darker than it thinks it is. By dropping the exposure compensation, you preserve the "veins" and textures in the lava flow. This is how you get that deep, rich crimson rather than a neon pink smear.
There’s also the blue hour. That’s the sweet spot. About 20 to 40 minutes after sunset, the sky still has a deep indigo hue. This provides enough ambient light to see the silhouette of the crater walls while the lava provides the "pop." If you wait until midnight, you lose the sense of scale because everything except the glow disappears.
The Helicopter Factor
If you really want those National Geographic-style volcano pictures from Hawaii, you probably have to get in the air. Companies like Paradise Helicopters or Blue Hawaiian often fly "doors-off" tours when there’s an active flow.
It is terrifying. And loud. And cold.
But it’s the only way to get a top-down perspective of a fissure or a perched lava pond. From the air, shutter speed is your god. The helicopter vibrates. The wind is whipping at 80 mph. You need a shutter speed of at least $1/1000$ or $1/2000$ of a second to freeze the motion. If you try to use a slow shutter to "let in more light," you'll just have a gallery of expensive motion blur.
Hidden Spots the Tourists Miss
Everyone goes to the Volcano House or the main overlooks. They’re fine. But if you want something different, you need to look at the historical flows outside the National Park.
Take the Chain of Craters Road. You’ll eventually hit a dead end where the lava swallowed the pavement years ago. The contrast of the yellow road lines disappearing under mounds of "pāhoehoe" (smooth, ropey lava) makes for an incredible foreground. It tells a story of nature reclaiming the infrastructure.
Then there’s the Puna District.
The 2018 eruption destroyed over 700 homes and created a brand-new black sand beach at Pohoiki. Shooting here is surreal. You have the bright green of the surviving coconut palms against the jagged, jet-black "ʻaʻā" (rough, blocky lava). It’s a color palette you won't find anywhere else on Earth.
Safety is not a suggestion
I can't stress this enough: stay on the marked trails.
People die taking volcano pictures from Hawaii. It’s not usually the lava that kills them; it’s the ground. Lava tubes create hollow shells. You might think you’re walking on solid rock, but you’re actually walking on a two-inch thick crust over a thirty-foot drop. Or you’re breathing in "laze"—lava haze—which is basically aerosolized hydrochloric acid and glass particles.
If the National Park Service (NPS) closes an area, it’s for a reason. Use a long lens (300mm or more) to get close-ups. Don't use your "human legs" to get close-ups.
Composition Secrets for Scale
The biggest problem with volcano photography is that lava often looks small in photos. Without a point of reference, a massive 50-foot fountain looks like a tiny sparkler.
- Include a Silhouetted Human: If it’s safe, have a friend stand a few hundred yards away (on a marked path). That human shape gives the viewer an immediate "Oh, wow, that thing is huge" moment.
- The Horizon is Your Friend: Don't just point down into the pit. Include the stars. Hawaii has some of the clearest skies on the planet. A shot of the Milky Way arching over a glowing Kilauea is the holy grail of volcano pictures from Hawaii.
- Focus on the Cracks: Don't just shoot the big fountain. Get tight on the cooling crust. The way the silver-grey rock splits to reveal the orange heat underneath is incredibly hypnotic.
Honestly, sometimes the best photo isn't of the lava at all. It's the "ghost forests"—the skeletons of trees bleached white by the heat and gases, standing in a field of black stone. They look like something out of a sci-fi movie.
Dealing with "Vog" (Volcanic Smog)
Vog is the bane of every photographer’s existence. It creates a flat, grey haze that kills your contrast. You’ll find it most often on the Kona side of the island when the trade winds blow the sulfur dioxide from the volcanoes toward the west.
If you’re stuck in vog, don't fight it. Switch to black and white.
High-contrast black and white photography thrives in hazy conditions. It turns a muddy, grey landscape into a moody, atmospheric masterpiece. You can lean into the "apocalyptic" vibe of the island.
Actionable Steps for Your Photo Trek
If you're planning to capture your own volcano pictures from Hawaii tomorrow, here is your immediate checklist:
- Check the USGS HVO "Daily Update": Bookmark their site. It tells you exactly where the activity is, the volume of the flow, and the current gas levels. If the "Lava Lake" is crusting over, you might want to wait a day.
- Clean Your Sensor: You’re going to be changing lenses in a windy, dusty environment. Do a deep clean before you head to the park.
- Pack a Headlamp: Most of the best viewing spots require a 15–30 minute walk over uneven terrain. Trying to navigate a 1974 lava flow using your phone’s flashlight is a great way to twist an ankle. Get a real headlamp with a red-light mode to preserve your night vision.
- Shoot in RAW: This is non-negotiable. The dynamic range of a volcano is too much for a JPEG to handle. You need those raw files so you can pull the detail out of the shadows and tone down the "blown out" oranges in post-processing.
- Respect the Culture: To many Hawaiians, the volcano isn't just a "tourist attraction." It’s the home of Pele. Taking rocks from the park is not only illegal, but it's deeply disrespectful. Take your photos, leave the stones, and keep the spirit of "malama ʻāina" (caring for the land) in mind.
Getting that perfect shot requires patience. You might sit on a cold, windy rim for four hours just for the clouds to part for thirty seconds. But when they do, and you see that liquid fire pulsing against the dark Hawaiian sky, you’ll realize why people obsess over this.
Next Steps for Your Journey:
Head over to the official National Park Service (NPS) Hawaii Volcanoes website to check for current road closures and "Air Quality" alerts before you drive up the mountain. If the sulfur levels are high, they will shut down certain overlooks, so have a backup plan for the southern "pali" (cliffs) where you can often see older, solidified flows meeting the sea. Check the weather forecast specifically for the summit of Kilauea, as it can be raining at the park even if it's sunny at the beach in Hilo.